Dynamic KeyBinding System
Dynamic KeyBinding System is a plugin created to aid in reconfiguration of keys at runtime, with customizable instruction template , keybinding menu system , keyicon mapping and dependency bindings allowing you to quicky start creating your own KeyBinding Menu and Instruction system in no time.
Key reconfiguration at runtime is used in almost every game and is a very useful feature for game developers, with instructions to follow along for convenience of the user during gameplay is another feature used in conjunction with keybinding. This plugin combines both these extremely useful features and being inspired from the different techniques used in different types of games, adds a great deal of customizations to allow the user to quickly start implementing this feature according to project specific requirements.
Get It Here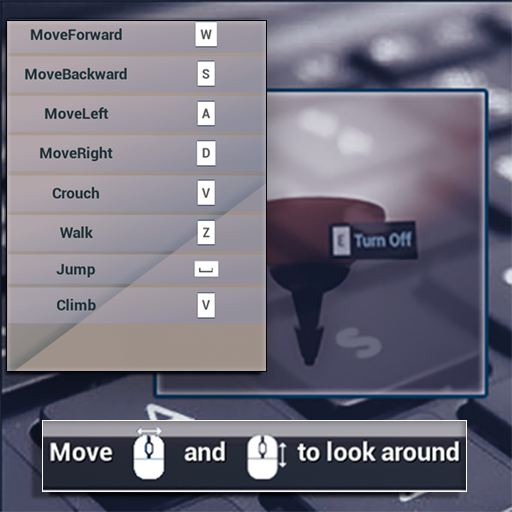
Features
Key Reconfiguration
Reconfigure Keys at runtime
Instruction Template
Create customizable instruction widget based on the current keybinding, with controls over how the user wants the instruction to appear and disappear
Key-Icon Mapping
Datatable based KeyIcon mapping allows the user to easily map keys with custom icons to display at runtime
Binding Categories
Group a set of Bindings by Categories
Dependency Mapping
Dependency Mapping can be created to perform an additional check if modified key for a given action is already bound to a dependent action. Multibinding group can be used to override dependency
Overview
Before we get started, it is important to get familiar with the contents that are included in this plugin, and the functionalities of different structures and datatables, that you are going to need for implementing this plugin in your project.
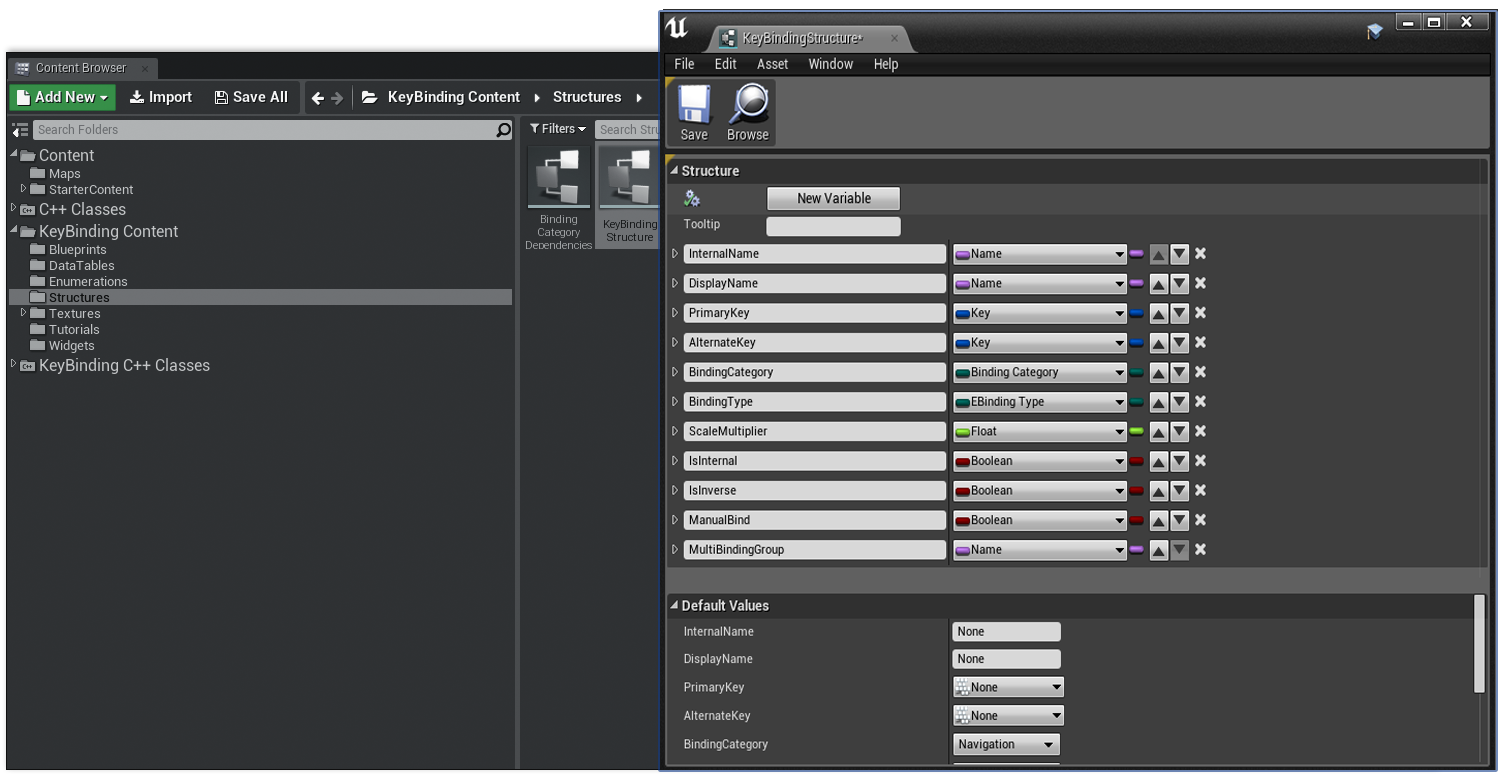
The KeyBinding Structure
To create a set of actions that you want to expose at runtime for reconfiguration , you need to first create the KeyBinding Datatable, derived from the KeyBinding structure.
| Data Type | Description |
|---|---|
| Internal Name | This is an optional parameter which denotes the name the given action is saved as in the Binding , if it is different from the Display Name. This is useful when you have multiple bindings for same action, and different display name for each binding, but you have to have same internal name in that case, otherwise each binding will have a different action. For example, Moveforward can be internal name to both forward and backward movement, which is determined by two different binding set. Similarly, two different categories can have common sets of bindings, but different actions for each category, so display name can be same in respective action of both categories but internal name should be kept different. |
| Display Name | This is the action name that is displayed on screen for a given action. When no Internal Name is specified, this is also the action name for the given binding. |
| Primary Key | Primary Key corresponding to the given binding. |
| Alternate Key | Alternate Key corresponding to the given binding. |
| Binding Category | Category of the Binding the given action belongs to. Categories are custom to the specific project, and can be created by the user. For example, given binding action can fall into Movement or Combat category. Categories are mainly useful in designing customized KeyBinding Widget. |
| Binding Type | Whether the given Binding is Action or Axis type. |
| Scale Multiplier | If the binding is of Axis type, Scale multiplier will multiply the binding scale. This should be a positive number. |
| Is Internal | Internal Bindings are excluded from reconfigurable menus. Like if we want to prevent the Escape key from being exposed to reconfiguration, we mark it as Internal. |
| Is Inverse | Inverses the Axis Scale of the given binding. |
| Manual Bind | Marking a given binding as Manual Bind allows user to manually restrict the binding action from being executed until specific trigger point is reached. Usually this is linked with Instruction template and if we want the given binding to only unlock when the corresponding instruction is being displayed on screen, we mark it as Manual Bind, and we check for manual binding in the respective action event. |
| MultiBinding Group | While Dependency Binding allows user to create dependencies between categories, the MultiBinding Group overrides the dependencies, i.e. two actions having same group name can be bound to same or different key. |
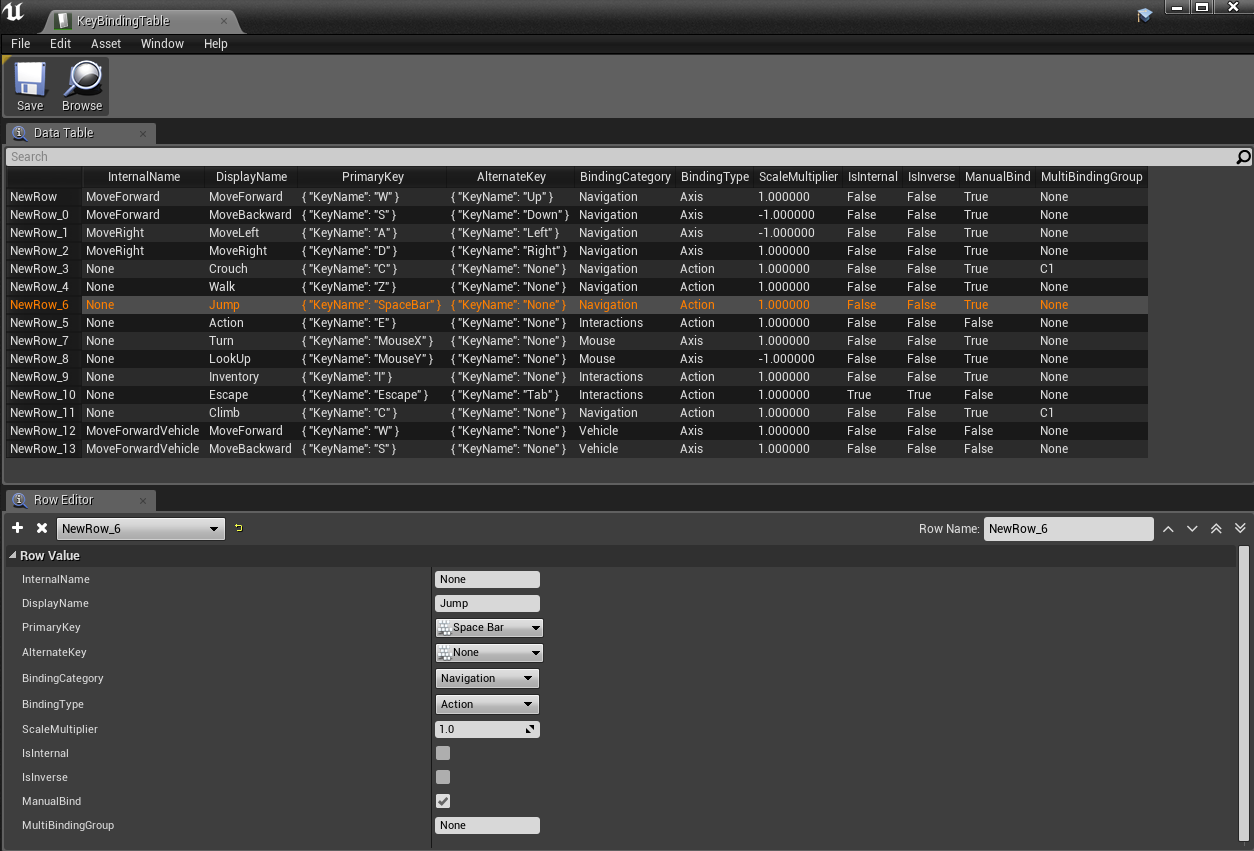
Your KeyBinding datatable should contain all the actions that you are looking forward to use in your project, especially the ones you want to expose for reconfiguration at runtime.
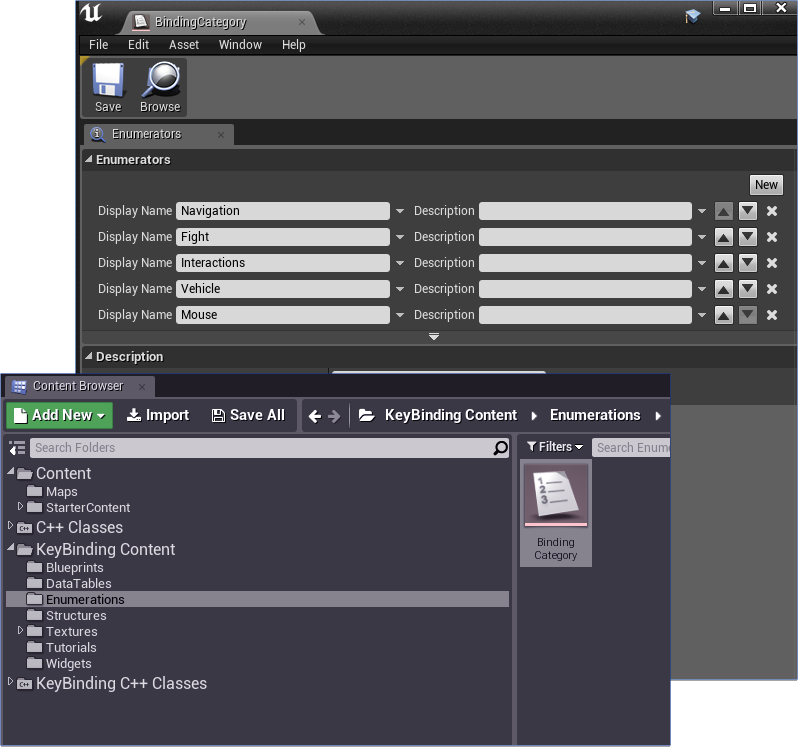
Binding Categories
To create categories for your bindings, you need to modify the Binding Category enum, to add your category names. If you take a look into the KeyBinding structure above, we have a Binding Category column, which takes this enum value, hence specifying the category name for the given action.
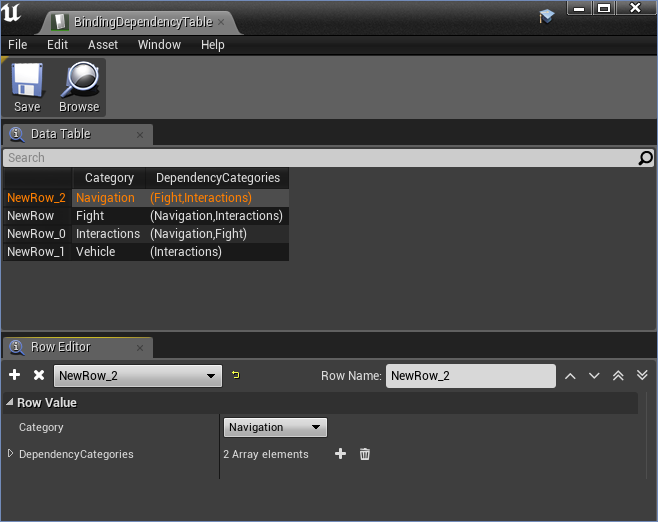
Binding Dependencies
Adding Binding Dependencies will allow you to perform an additional check when the player is trying to add same key for two different bindings. Binding Dependencies are added on category level. So if a category is dependent on another category, then a warning can be displayed on screen when the player is attempting to add a key in one of the bindings from the former category, which is already bound to another binding from the later category.
Binding Category Dependencies structure is where we add our Binding Dependencies. This structure contains a Binding Category enum and an array of Binding Category enums against the given category.
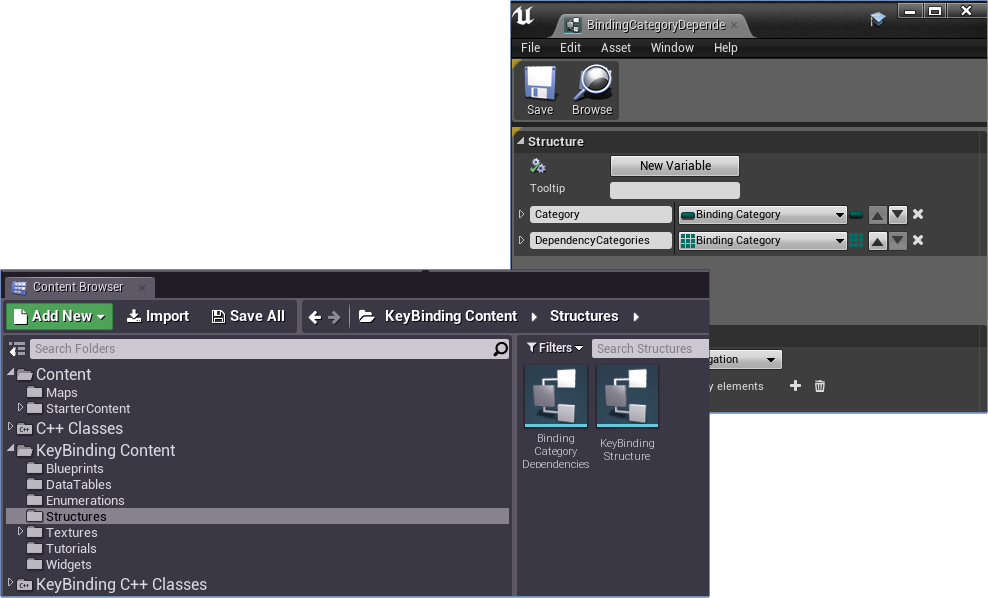
So for example, you have Navigation category which is dependent on Fight and Interactions Categories. Then in the datatable derived from this structure we add both the categories against the Navigation category. Vice versa is not valid by default so we need to add each Category seperately in our Dependency table.
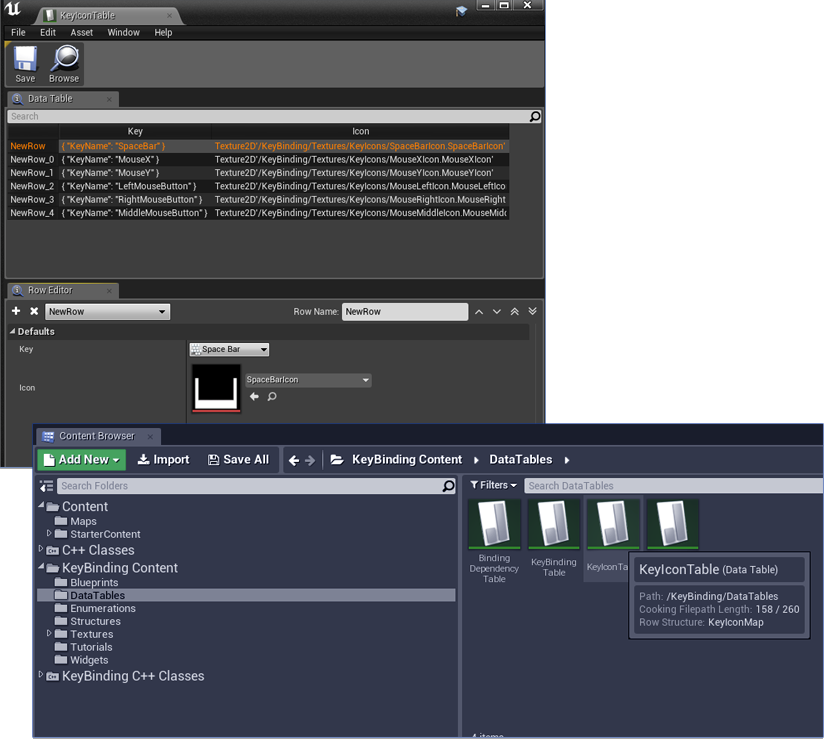
Key-Icon Mapping
We often need to display icons corresponding to specific keys, instead of names of those keys. For example, suppose we have Left Mouse Button bound to Fire action, and we want a icon corresponding to the Left Mouse Click to be displayed whenever the action key needs to be displayed on screen, we would then simply need to check out Key-Icon mapping to find the Icon connresponding to the given key bound to the given action.
To create our Key-Icon Mapping, we create a KeyIcon Datatable which is derived from the structure KeyIconMap. We add all the relevent keys and the corresponding icon textures in this datatable.
Instruction Template
Ingame instructions are essential for almost every game as player often needs to be told about what to do next, or which action serves the specific purpose that will help the player progress further during gameplay. Customizable Instruction Template aids the user in creating own sets of instructions with a set of useful behaviors to choose from.
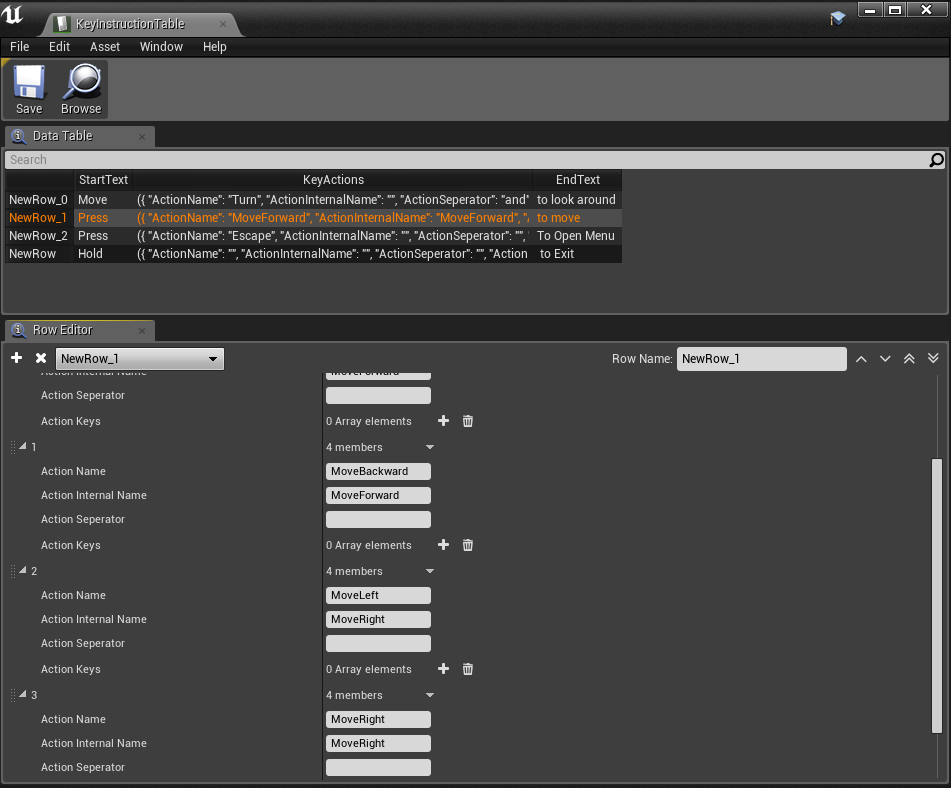
The Datatable derived from the KeyInstruction structure contains all the instructions that you want to display in the entire game.
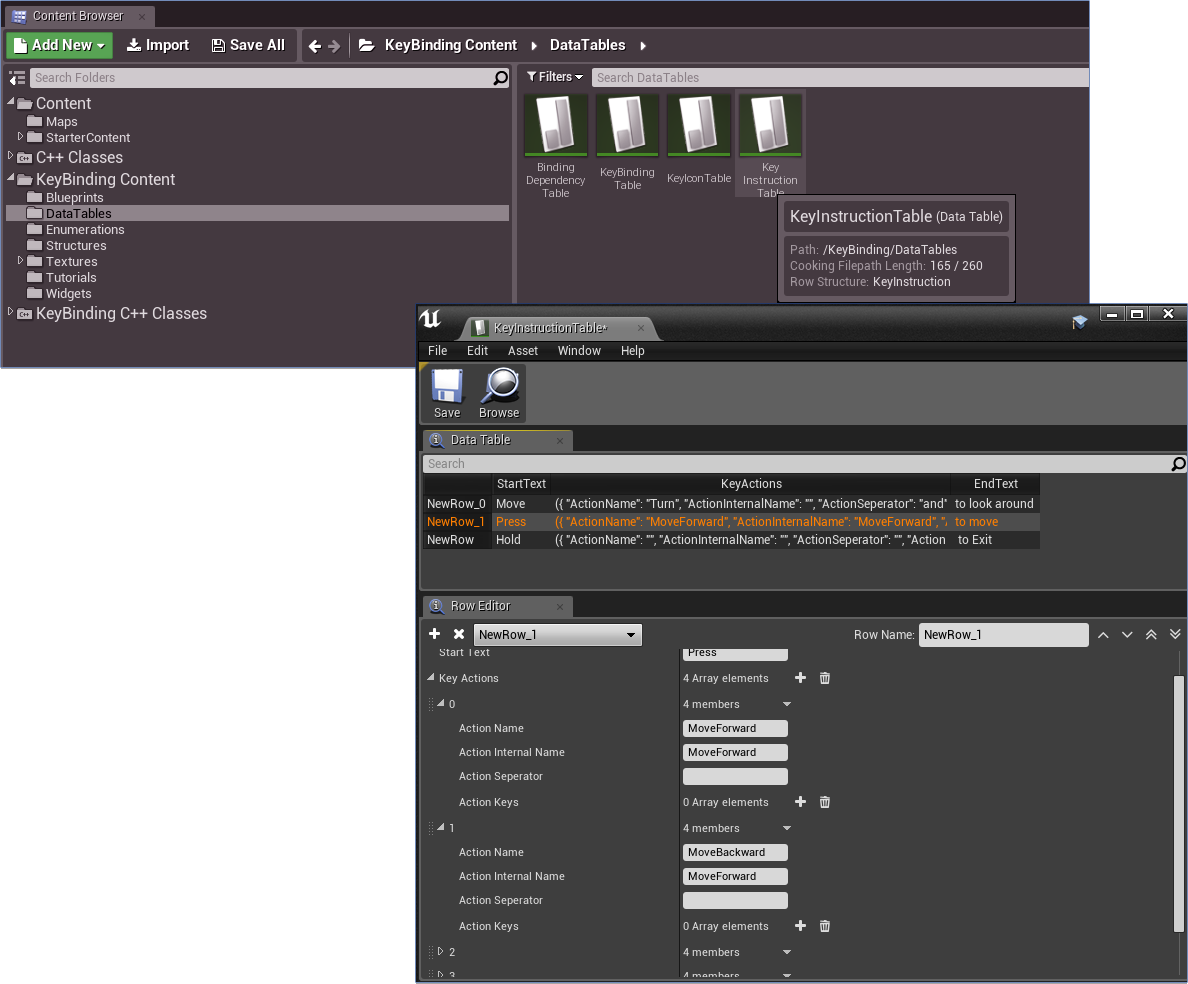
| Data Type | Description | ||||||||||
|---|---|---|---|---|---|---|---|---|---|---|---|
| Start Text | Text that is to be displayed at the start of the instruction. | ||||||||||
| Key Actions | An array of KeyActionMap structure which contains all the KeyActions that are bound to this given instruction.
|
||||||||||
| End Text | Text that is to be displayed at the end of the instruction. |
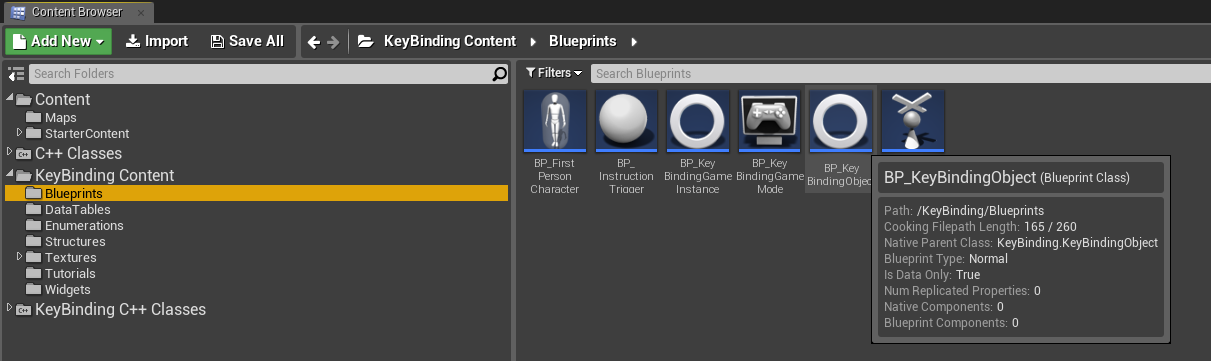
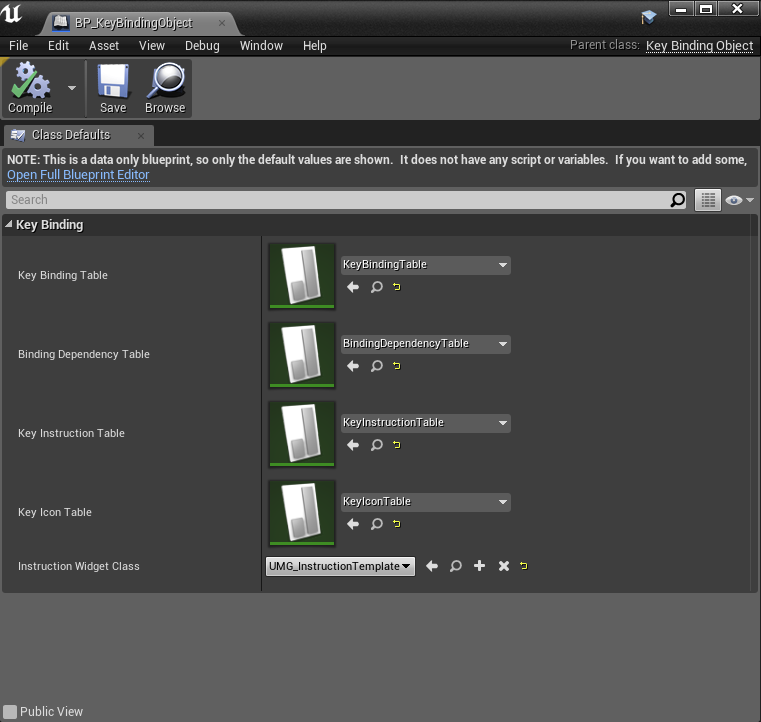
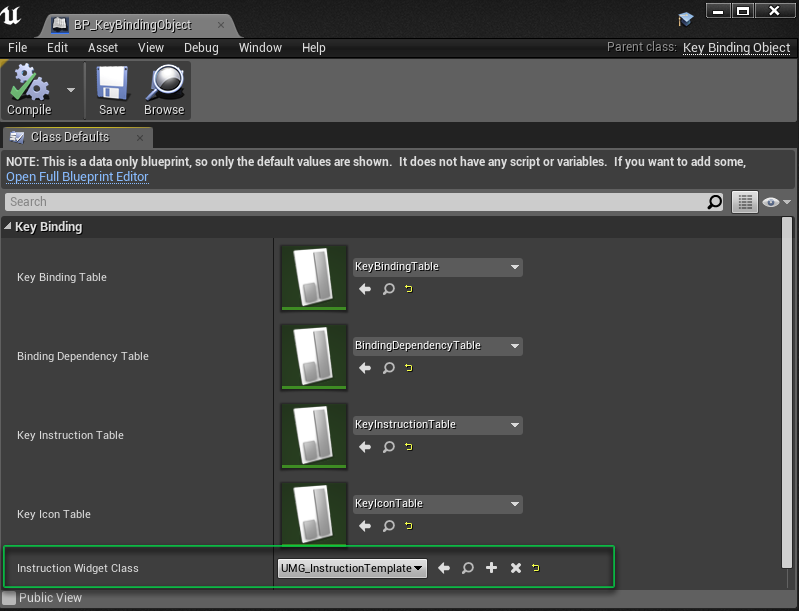
KeyBinding Object
The KeyBinding Object class is where we are going to store references to all our datatables and also our instruction widget template for using at runtime. This class plays a pivotal role in easily adding instructions on screen, from the given instruction template.
Getting Started with Key Customization
Now that we have learnt about brief overview of various components in this plugin, it is time for us to get started implementing this plugin to create our own KeyBinding system.
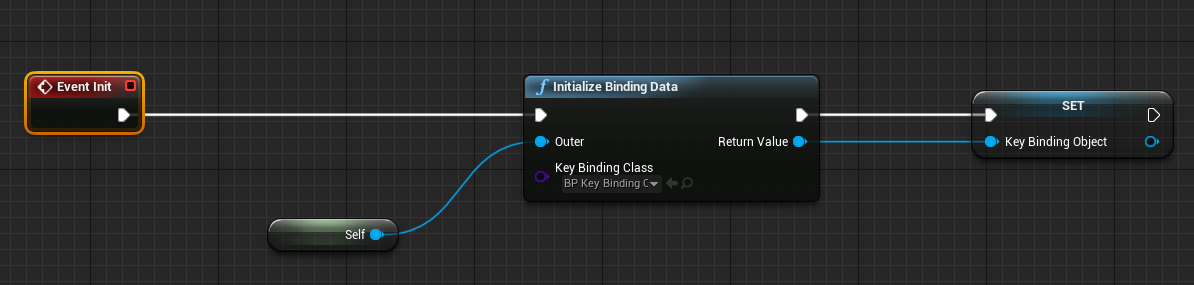
If you are familiar with GameInstance classes, you must be aware that GameInstances are used to store variables between levels, and if you want to execute a block of codes at the beginning of the game and not every level, you would rather write that code in your GameInstance class and not in PlayerController or any other classes. To initialize our KeyBinding System, we can conveniently use GameInstance class.
The static function Initialize Binding Data saves the changes to your datatables in seperate files, to be accessible later. It also creates and returns an instance to the keybinding object. This instance can be accessed later if saved in a variable.
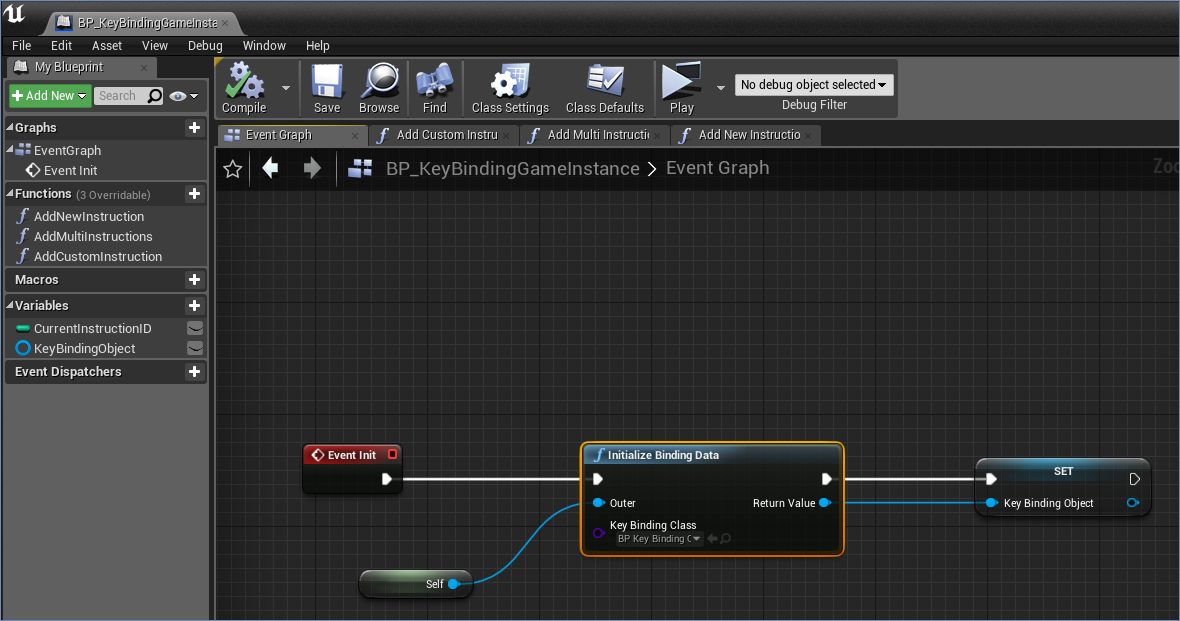
This function takes the class reference of our KeyBinding Object, where we have added references to our Datatable.
Creating KeyCustomization Widget
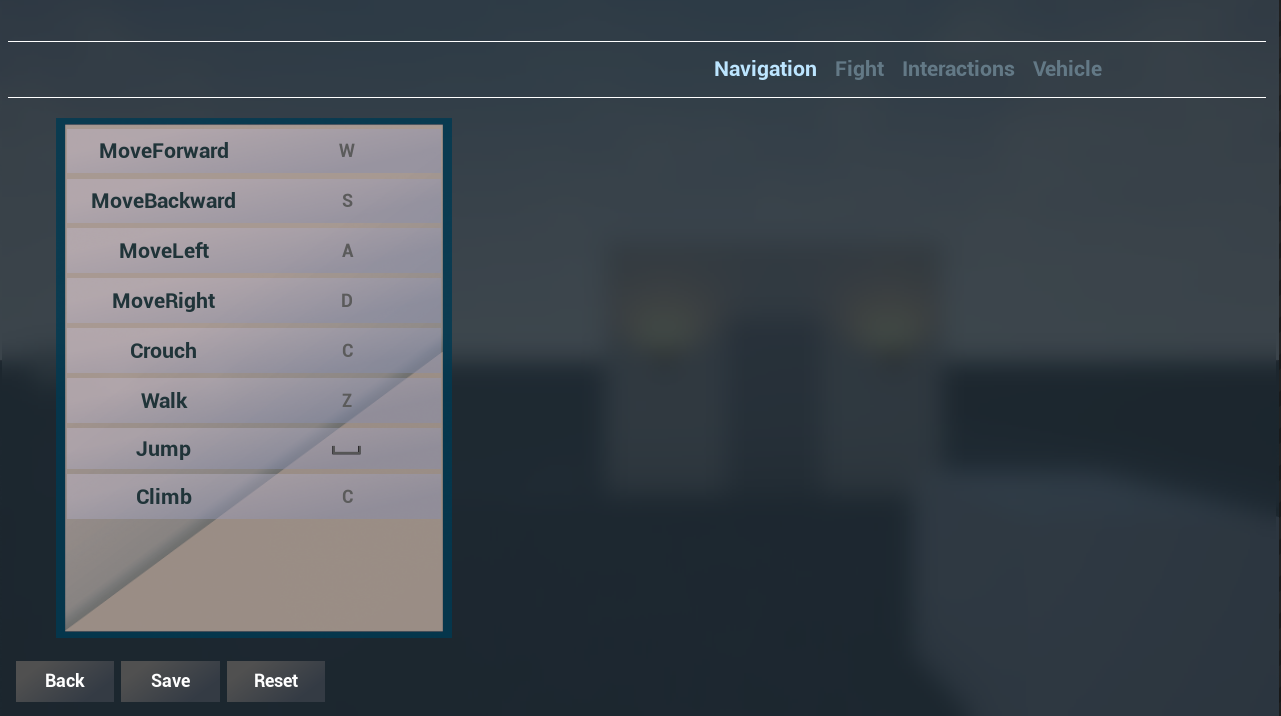
Now every game has different requirements when it comes to how the KeyCustomization UI needs to be displayed and behave. You may choose to divide your Action mapping by categories, or you may keep everything together. You may also have Primary as well as Alternate Key mapping for the same action. Some games such as Assassins Creed Origins allow gamepad remapping as well, and also have the option to bind same key for two different actions without interfering the gameplay behavior.
Here we will learn how to create a simple KeyCusomization Widget which has the actions divided into Binding Categories and we will implement the Dependency Mapping feature in this example. This is not a simple drag and drop process but will help you get an idea and also understand the functionality that you need to get accustomed with in order to create your own KeyCustomization Widget.
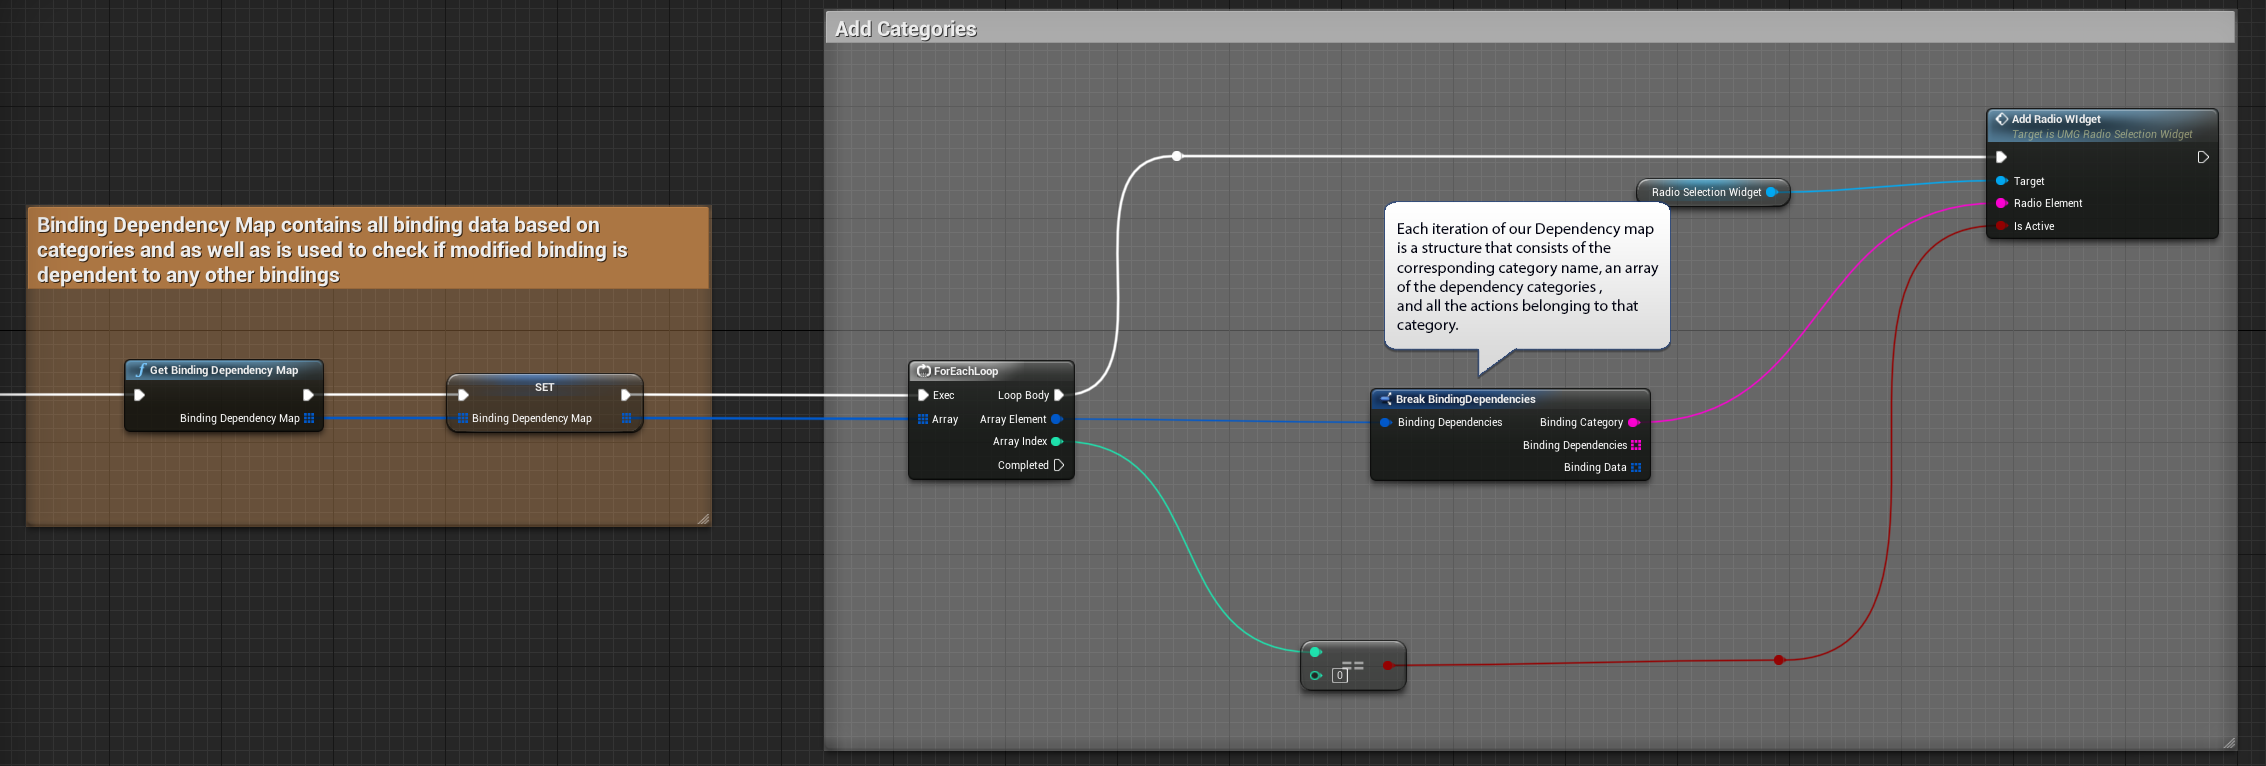
The Dependency Map
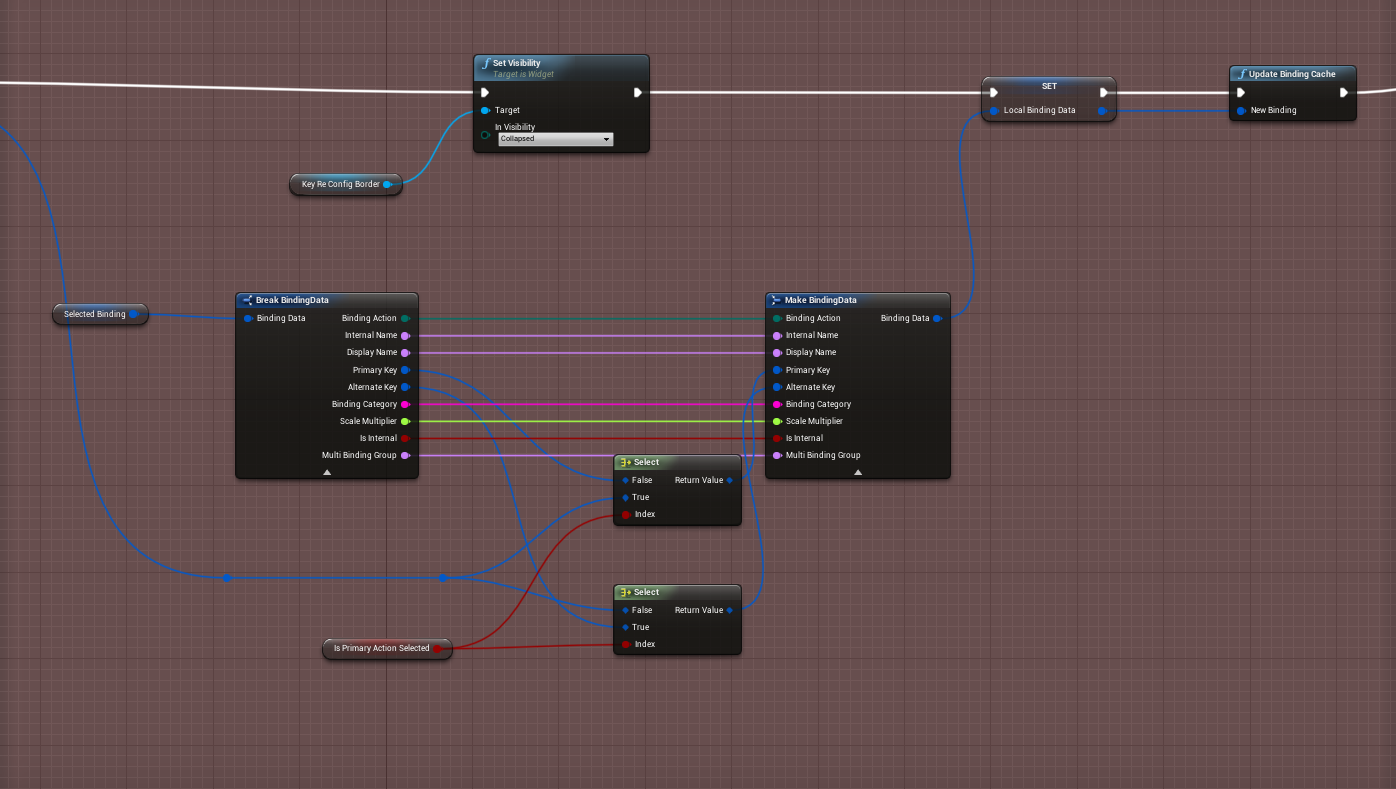
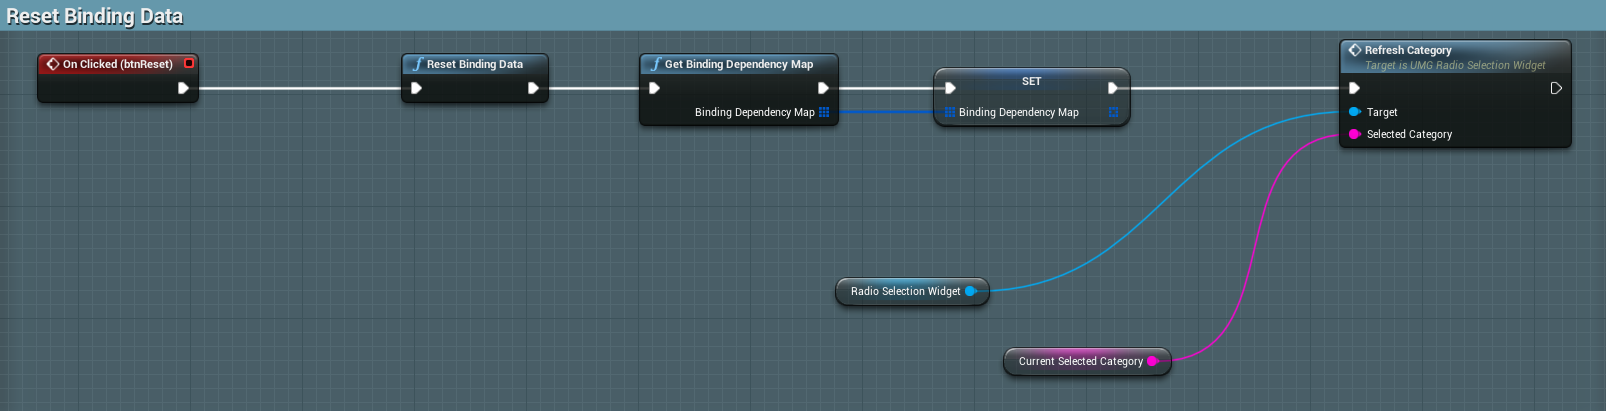
We have already learnt how to create the Dependency table, which is basically a mapping between a given category and categories dependent to this category. Now it is important for us to retrieve the Action Data grouped by Binding Categories. So we call the function Get Binding Dependency Map, which returns structures of our Binding Data grouped into categories, and also contains the dependency information.
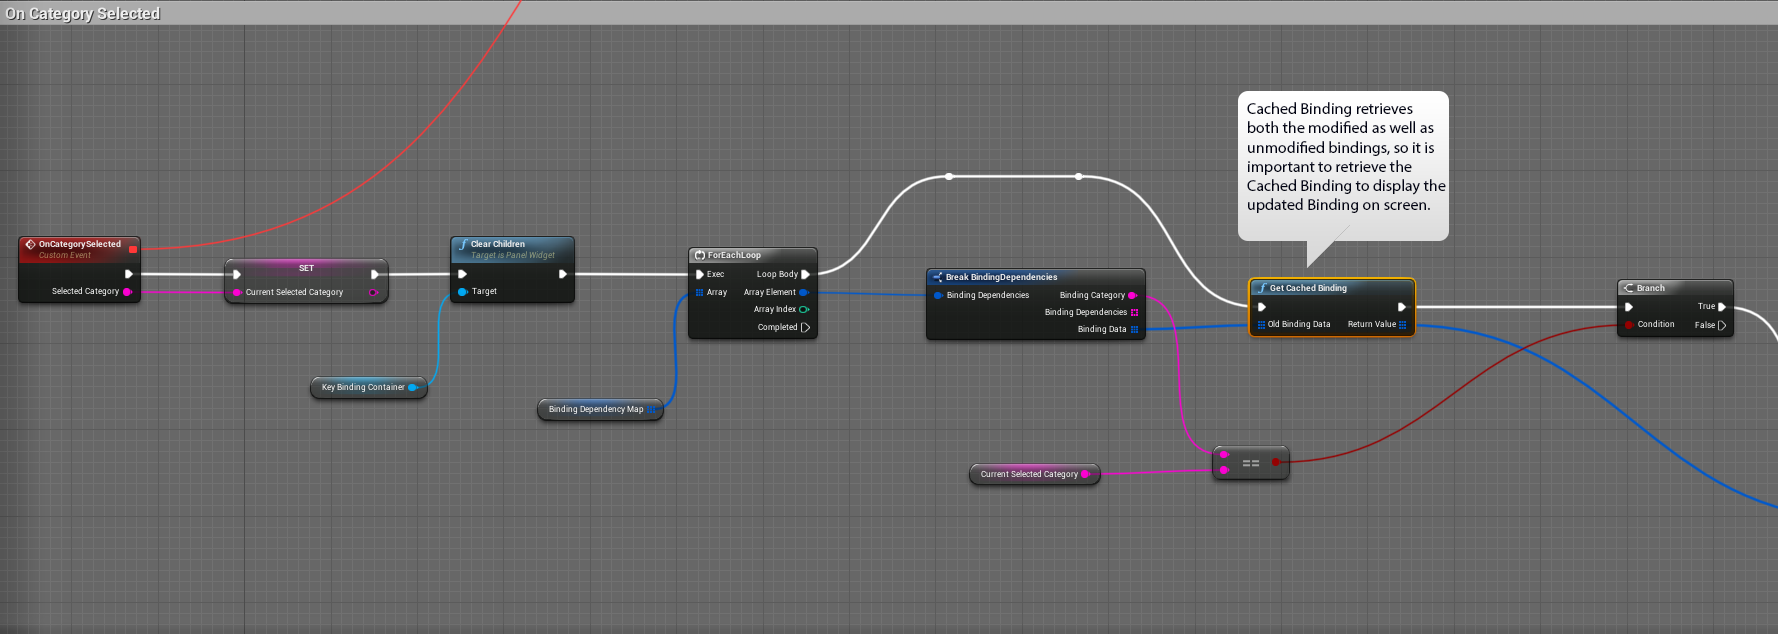
The Cached Binding
Data updated in this KeyCustomization widget is temporarily stored in CachedBinding until we Save the data. So when we are fetching our Binding Data for the given category, we also need to check if the keys for the previously saved binding is updated in the cache, and fetch the updated Bindings accordingly. The function Get Cached Binding will return the modified as well as the unmodified bindings. It is important to clear the cache when we move on to other widgets to prevent retrieving the unsaved Bindings.
Check Existing Binding
When the user presses a key to modify the current binding with, we first check if the key is already bound to a dependent action. The function Check Existing Binding is used to validate if the current key selected by the user is already bound to another binding dependent to the selected binding.
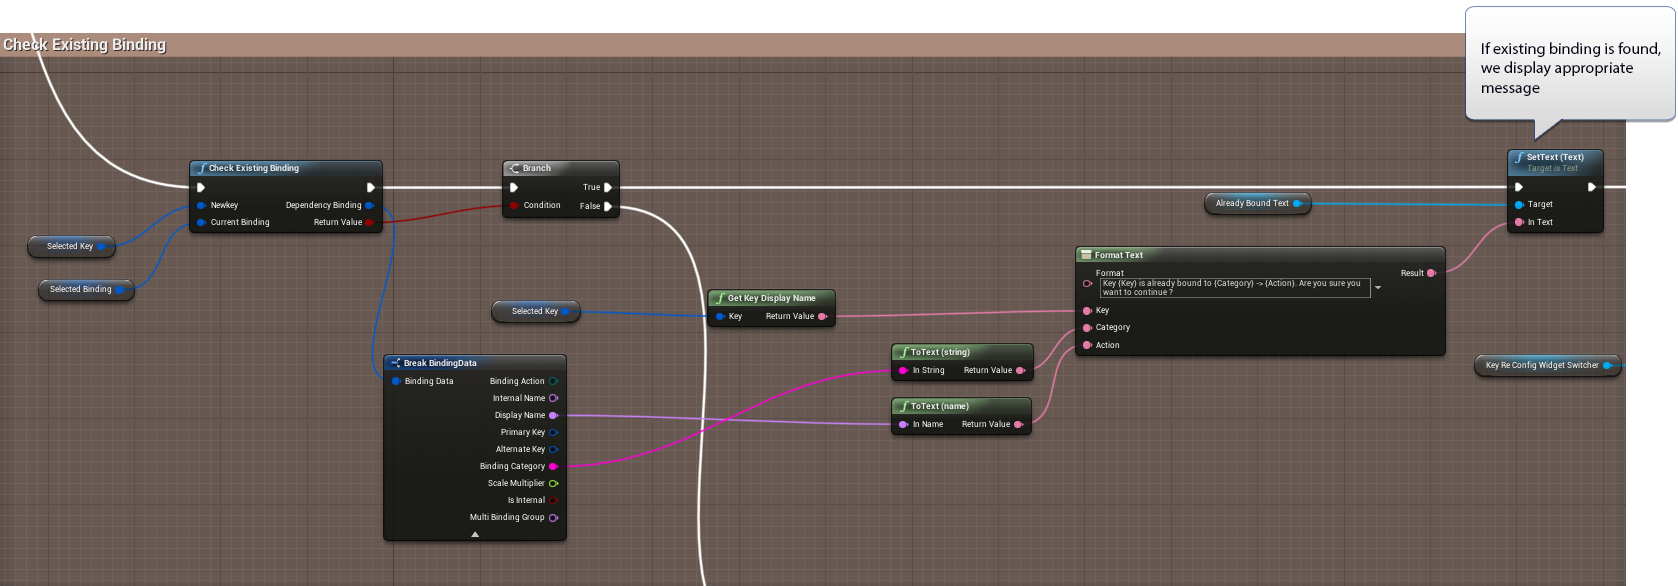
If you remember you can override the Dependency check for cases where you want to have two Dependent actions bound to same or different key, by specifying same MultiBinding group name in your KeyBinding Table.

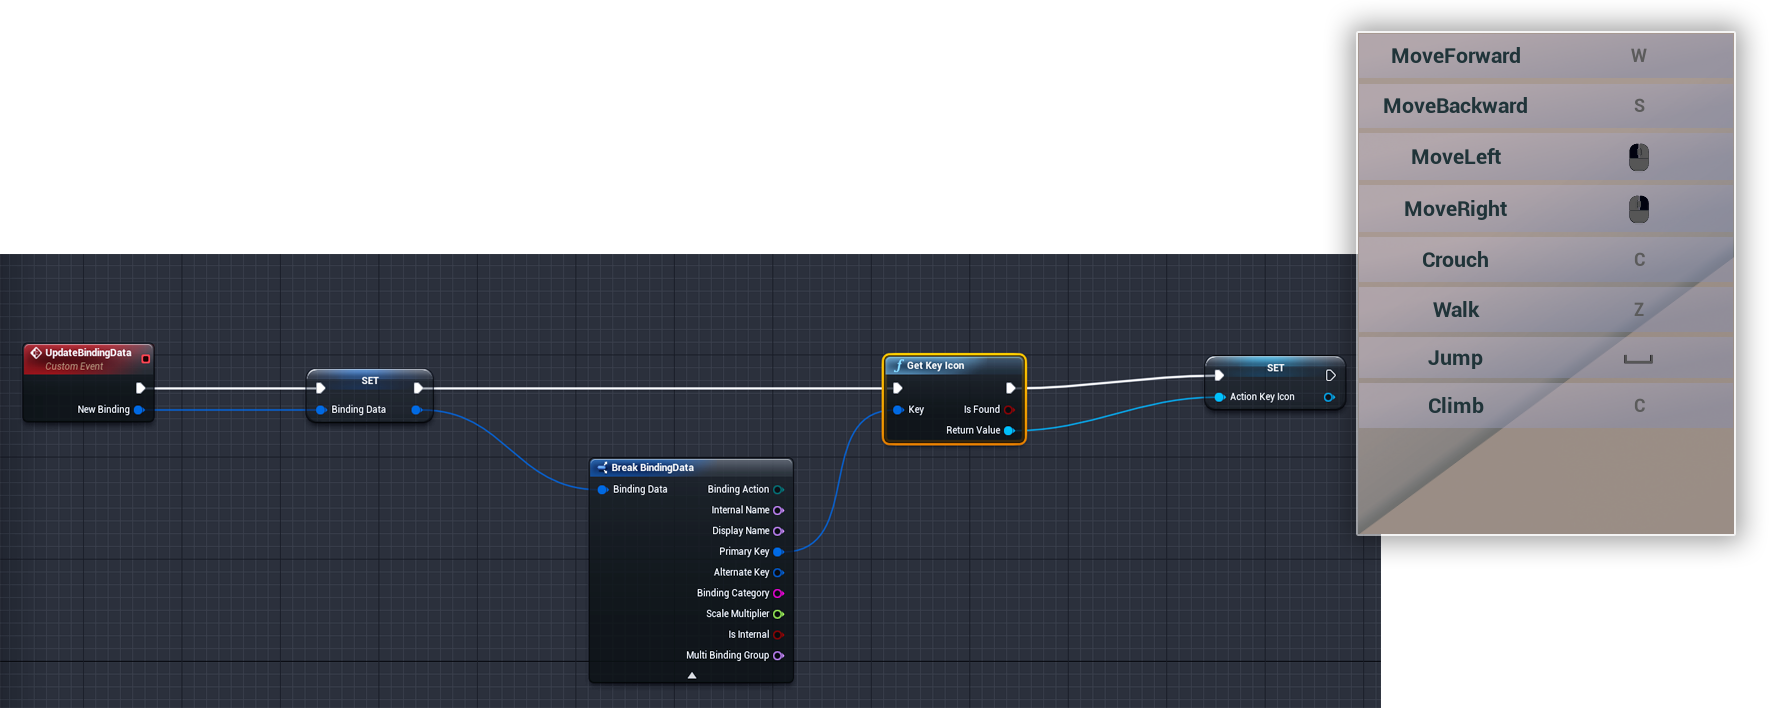
Update Binding Cache
We update the binding cache with the new binding by calling the function Update Binding Cache. If you remember, the Binding cache stores all unsaved modifications. This just adds unsaved items in the Binding cache whenever we are rebinding the selected action with new key. This does not permanently save the Binding, and can be cleared later.
Get Key Icon
You may choose to display an icon corresponding to a given key. If you remember our KeyIcon mapping, the data we have saved in that KeyIcon Datatable can be retrieved here by calling the function
Get Key Icon, which takes the given key as input and returns the corresponding texture.
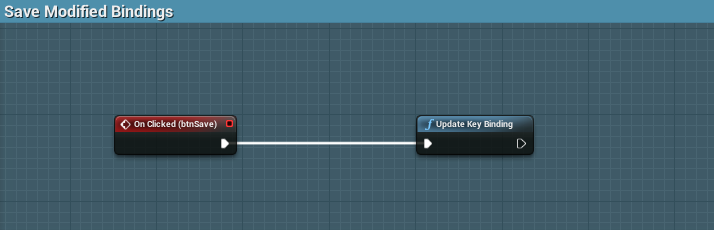
Update Key Binding
To permanently save the modified bindings that are stored in the Binding cache, we call the function Update Key Binding.
Reset Binding Data
To reset the Binding data to default values that we have stored in our KeyBinding Datatable, we call the function Reset Binding Data.
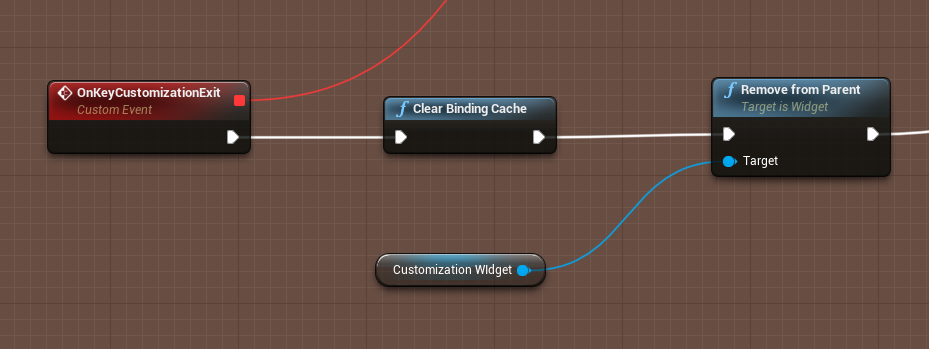
Clear Binding Cache
It is important to clear the Binding cache when we move over to other Widgets or resume our game, without saving the modified bindings, in order to prevent displaying the unsaved Bindings the next time we open our KeyCustomization widget, when we retrieve our Cached Binding. To clear our Binding Cache, we call the function Clear Binding Cache.
Update Independent Bindinngs
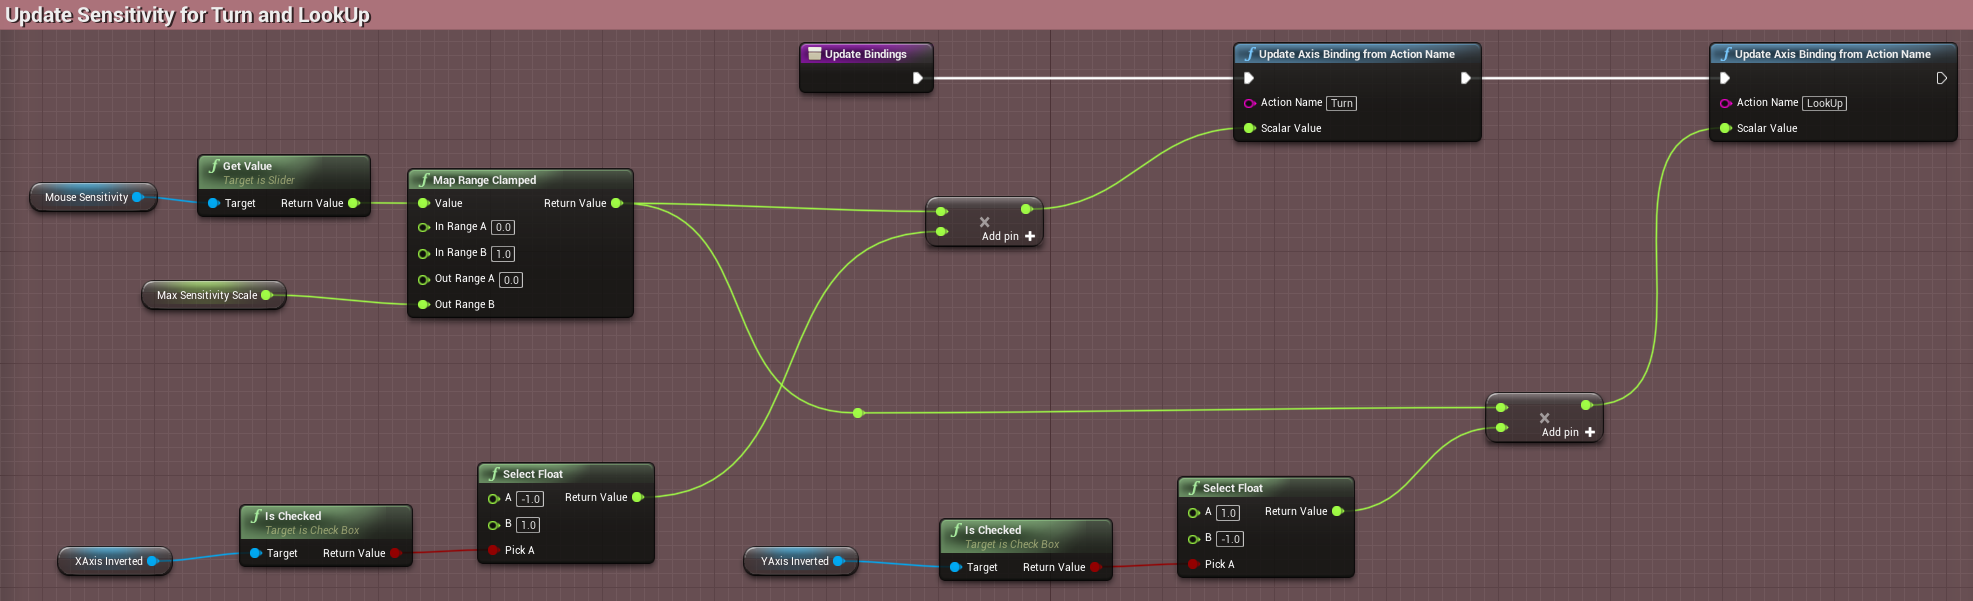
We just learnt how to create a KeyConfiguration system based on Dependent Bindings. What there maybe Bindings which are unique in themselves, independent to other bindings and deserve seperate UI system. There are three very common independent bindings that we find in KeyConfiguration menu in almost all games, namely, Mouse Sensitivy, and Inverted Mouse X and Y axis.

Get Binding from Action
Call the function Get Binding from Action to get the binding data of a single action by action name. From your Binding data, you can get your current scale value, which you can use to display in your UI, like in your Mouse Sensitivity you can get the current scale value and position your slider accordingly.
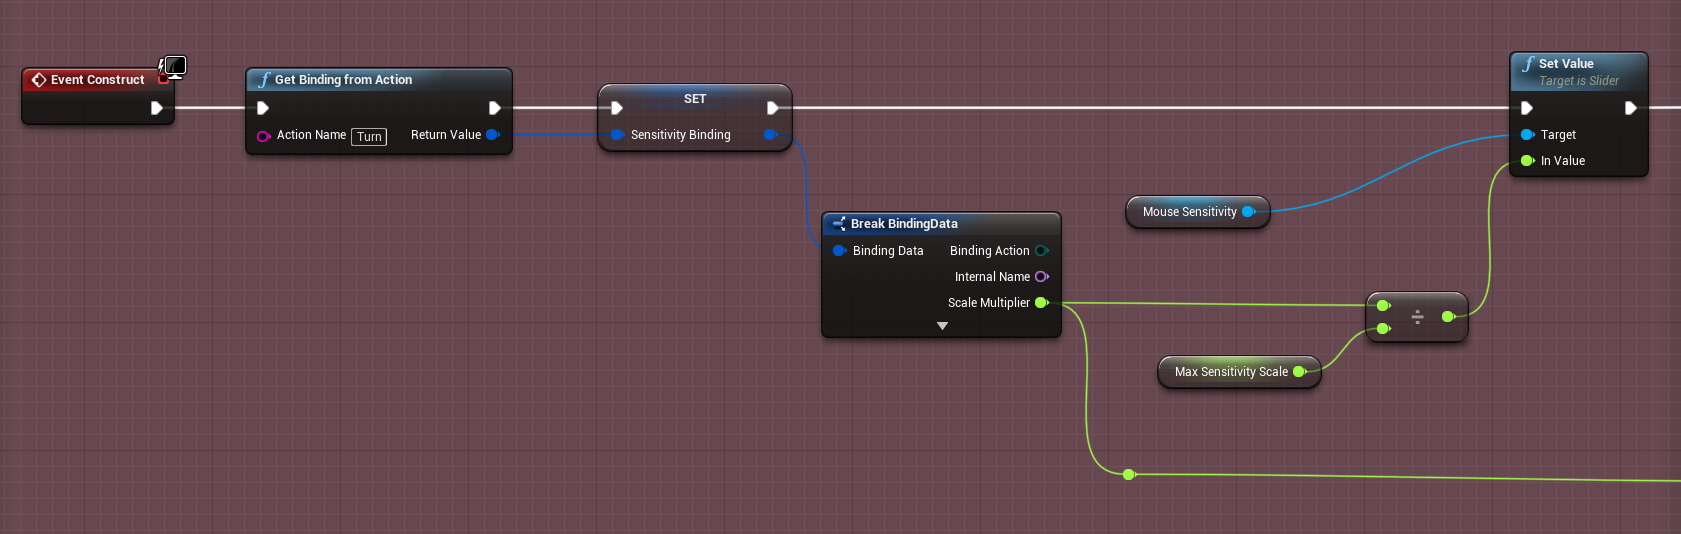
Update Axis Binding
Call the function Update Axis Binding from Action Name to update axis value of an individual binding.
Getting Started with Instruction Template
Instructions and In-game tutorials that tell you what do to next, which keys to press to progress further, are very common in games. But how you want to display the instructions and whether the instructions will be processed on respective key pressed, or automatically after a time interval, or on manual button pressed, depends on the project. So here we will learn how to use plugin to build your own custom the Instruction Template.
If you remember, the KeyInstruction datatable, derived from the KeyInstruction structure, contains a list of all the instructions that you want to display.
Adding Instructions on Screen
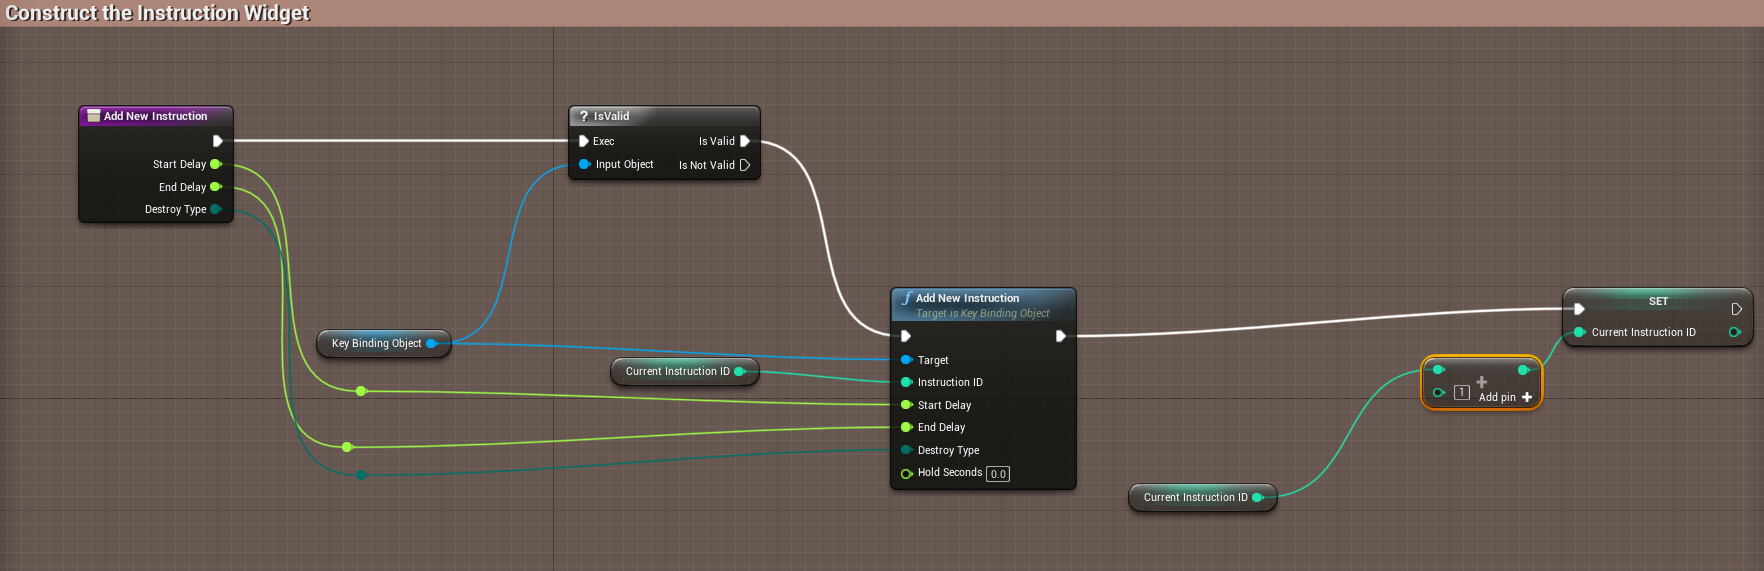
So in our gameinstance we have called the function Initialize Binding Data which returns an instance of the created KeyBindingObject. We save this variable here, because we can add instructions to our game via this KeyBindingObject only.
Adding New Instruction
To add a new instruction we take a reference to our KeyBindingObject instance, and call the function Add New Instruction.
| Input | Description | ||||||||||||
|---|---|---|---|---|---|---|---|---|---|---|---|---|---|
| Instruction ID | InstructionID is the row number for the row in your KeyInstruction Datatable, which contains the Instruction data you want to currently use. | ||||||||||||
| Start Delay | Starting Delay before the Instruction appears. | ||||||||||||
| End Delay | Ending Delay before the Instruction disappears. | ||||||||||||
| Destroy Type | How the current instruction is going to be destroyed.
|
||||||||||||
| Hold Seconds | HoldSeconds determine for how many seconds the player needs to hold the relevant key in order for the Instruction to be processed. |
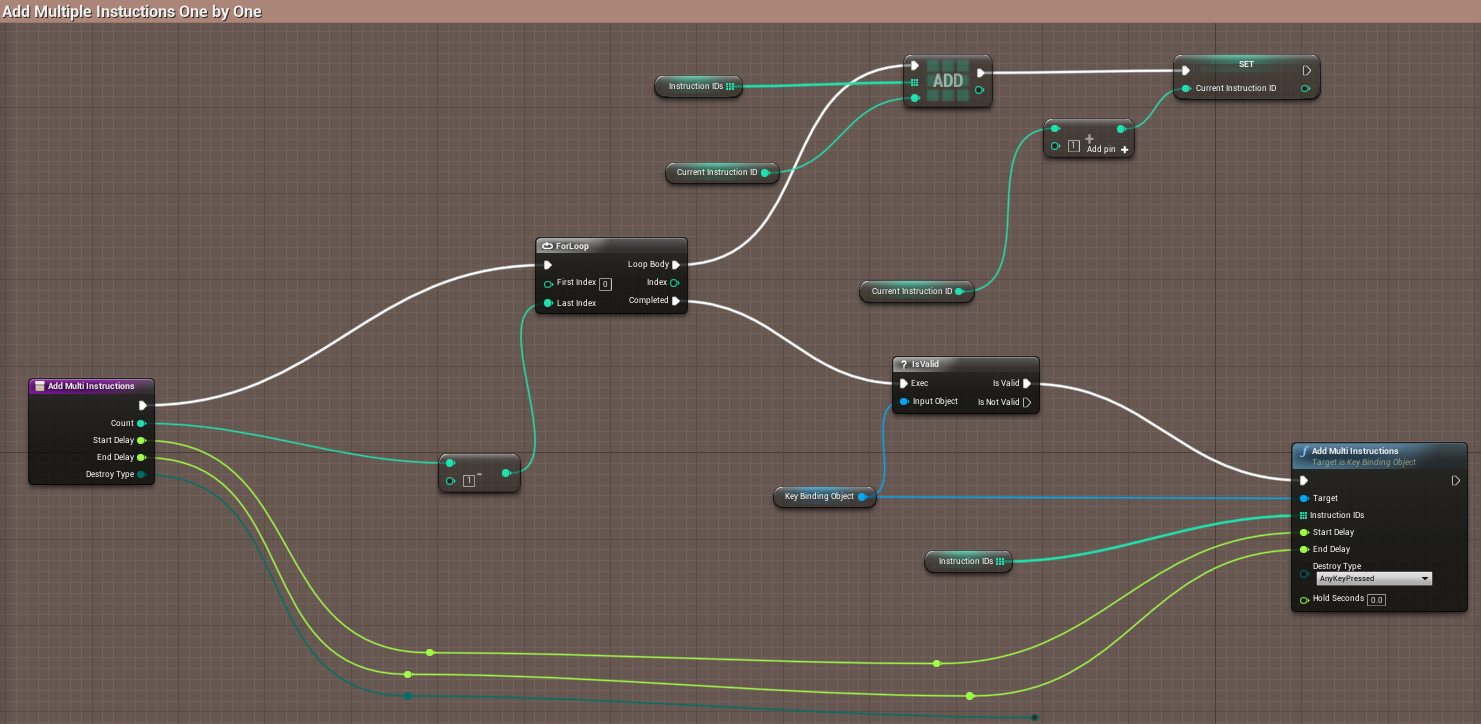
Adding Multiple Instructions
If you want to add multiple instructions one by one, which have similar parameters, then you can call the function Add Multi Instructions.
| Input | Description |
|---|---|
| Instruction IDs | InstructionIDs are the row numbers for the rows in your KeyInstruction Datatable, which contain all the Instruction data you want to currently use. |
| Start Delay | Starting Delay before each Instruction appears. |
| End Delay | Ending Delay before each Instruction disappears. |
| Destroy Type | How the current Instructions are going to be destroyed. |
| Hold Seconds | HoldSeconds determine for how many seconds the player needs to hold the relevant key in order for every Instruction to be processed. |
Creating Instruction Widget
It is upto you how you want to design the Instruction widget, but to be able to integrate your Instruction Widget with my plugin, you have to derive the Widget from the base class Instruction Template Widget.
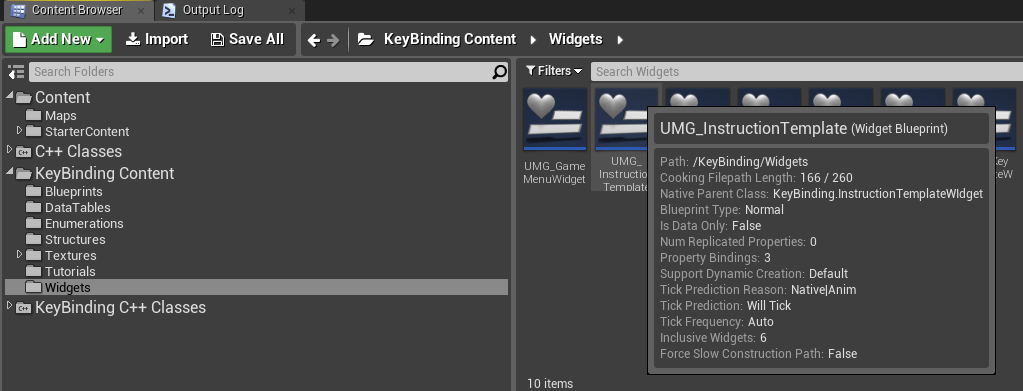
Once you created your Instruction Widget you need to add a reference to it in your KeyBindingObect BP instance. This is because our KeyBindingObect is used to add new instructions on screen and define the behavior of the instructions.
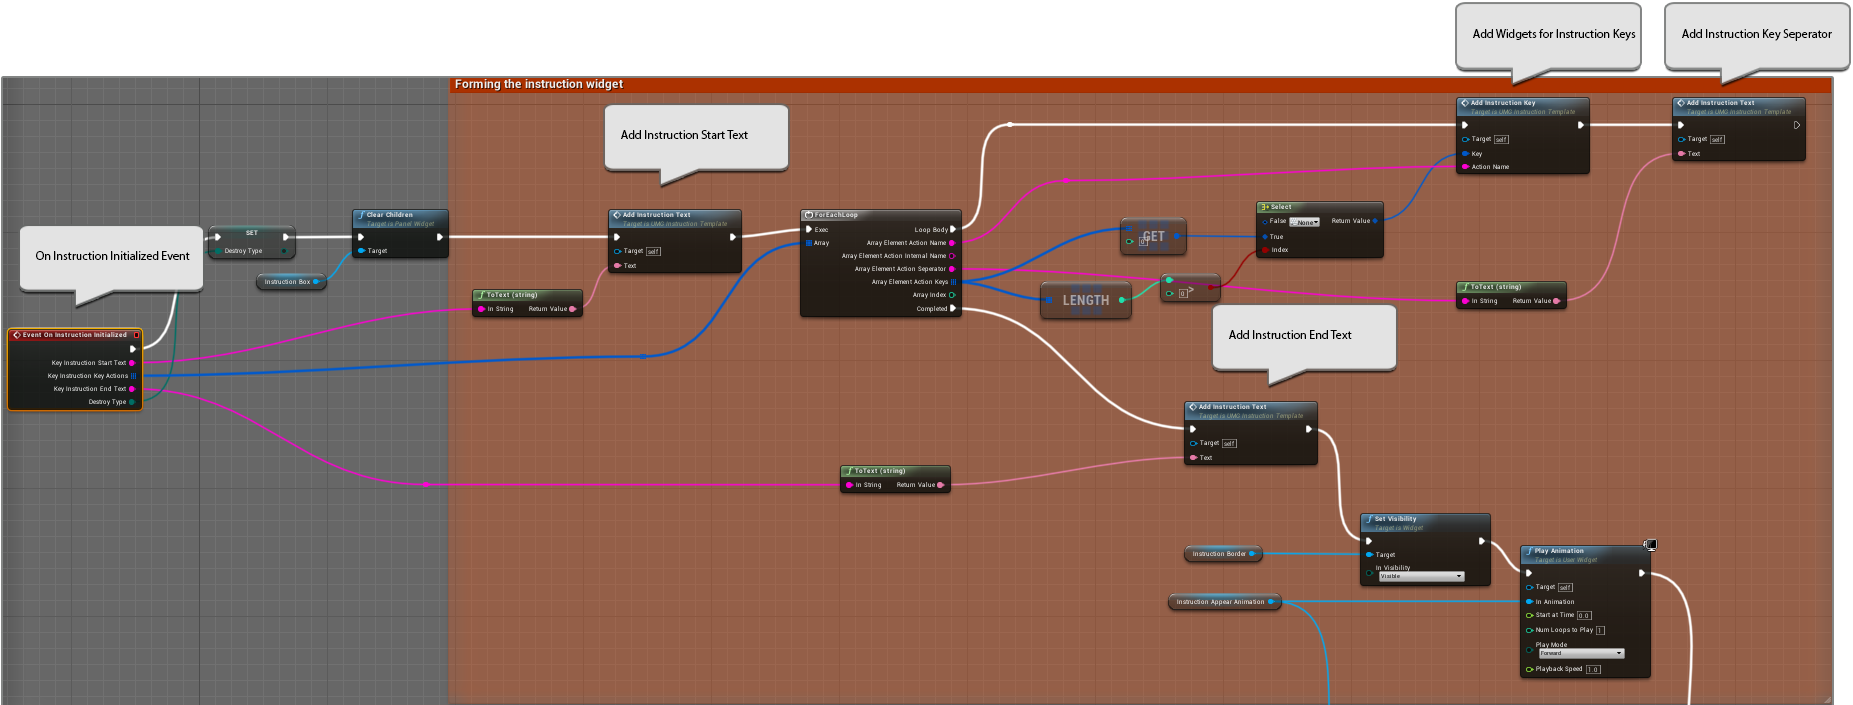
The Instruction Initialized Event
OnInstructionInitialized event is fired when you added a new instruction, after an interval equal to the start delay you provided. This contains the instruction data returned from the KeyInstruction datatable row corresponding to the InstuctionID you entered. It contains a text appearing at the start of the instruction, a set of actions which correspond to the keybindings respective to the given instruction, and text appearing at the end. It is upto the user how the instruction widget is to be constructed based on the data received.
Process Instruction
Once the Instruction is initialized, we need to call the function Process Instruction which performs the next step, e.g. If destroy type is AllKeysPressed or AnyKeyPressed it waits for the relevant key(s) as user input.

The Instruction Finished Event
This event OnInstructionFinished is triggered when an instruction is completed and we can perform the post completion steps here. This event will never be triggered if we have not called the ProcessInstruction function , or if the Destroy condition is not met..
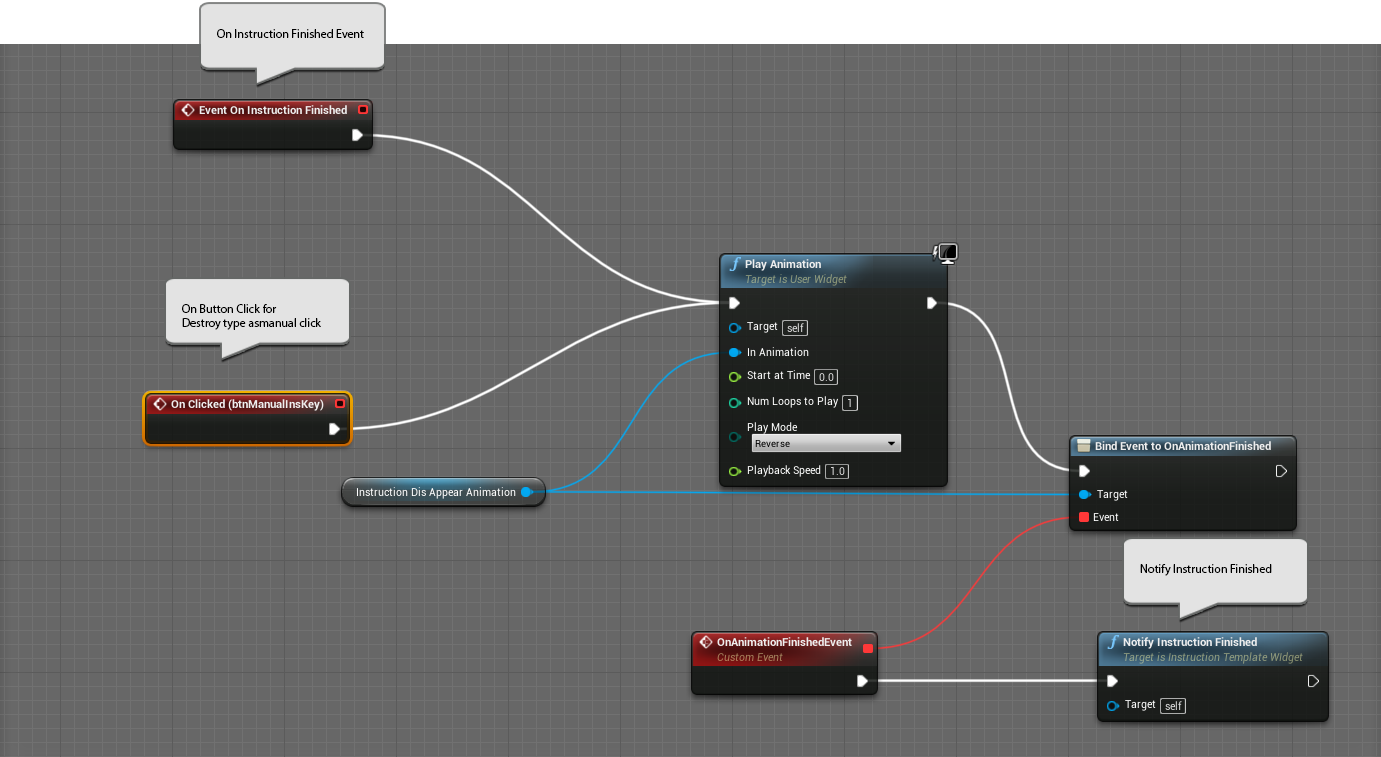
Notify Instruction Finished
Once we perform all the post completion steps, we have to call the function Notify Instruction Finished. This notifies our KeyBindingObject that the current instruction has been completed and we are ready to move on to the next instruction, if any.
The End
Thank you for your time. I hope you find this plugin useful. For technical difficulties, feedback, suggestions, queries, kindly drop me a mail at sameek4@gmail.com. I would love to hear from you.